Text
- class arcade.Text(text: str, x: float, y: float, color: tuple[int, int, int] | tuple[int, int, int, int] = (255, 255, 255, 255), font_size: float = 12, width: int | None = None, align: str = 'left', font_name: str | tuple[str, ...] = ('calibri', 'arial'), bold: bool | str = False, italic: bool = False, anchor_x: str = 'left', anchor_y: str = 'baseline', multiline: bool = False, rotation: float = 0, batch: Batch | None = None, group: Group | None = None, z: float = 0, **kwargs)[source]
Bases:
An object-oriented way to draw text to the screen.
Tip
Use this class when performance matters!
Unlike
draw_text(), this class does not risk wasting time recalculating and re-setting any text each timedraw()is called. This makes it faster while:requiring you to manage instances and drawing yourself
using negligible extra RAM
The speed advantage scales as more text needs to be drawn to the screen.
Tip
Batch drawing larger amounts of text
Text objects can also be assigned a pyglet batch for batch rendering small or large amounts of text instances. This is by far the most efficient way to draw text:
from pyglet.graphics import Batch

batch = Batch()
text_1 = Text("Hello, World 1", 0, 50, batch=batch)
text_2 = Text("Hello, World 2", 0, 100, batch=batch)
text_3 = Text("Hello, World 2", 0, 150, batch=batch)
# Draw the batch
batch.draw()
# Remove a text instance from the batch
text_2.batch = None
The text instances an also be modified while in the batch such as changing the text value, position, or color.
The constructor arguments work identically to those of
draw_text(). See its documentation for in-depth explanation for how to use each of them. For example code, see Better Text Drawing with Text Objects.- Parameters:
text – Initial text to display. Can be an empty string
x – x position to align the text’s anchor point with
y – y position to align the text’s anchor point with
z – z position to align the text’s anchor point with
color – Color of the text as an RGBA tuple or a
Colorinstance.font_size – Size of the text in points
width – A width limit in pixels
align – Horizontal alignment; values other than “left” require width to be set. Valid options:
"left","center","right".font_name – A font name, path to a font file, or list of names
bold – Whether to draw the text as bold, and if a string, how bold. See
boldto learn more.italic – Whether to draw the text as italic
anchor_x – How to calculate the anchor point’s x coordinate. Options: “left”, “center”, or “right”
anchor_y – How to calculate the anchor point’s y coordinate. Options: “top”, “bottom”, “center”, or “baseline”.
multiline – Requires width to be set; enables word wrap rather than clipping
rotation – rotation in degrees, clockwise from horizontal
batch – The batch to add the text to (for batch rendering text)
group – The specific group in a a batch to add the text to (for batch rendering text)
All constructor arguments other than
texthave a corresponding property. To access the current text, use thevalueproperty instead.By default, the text is placed so that:
the left edge of its bounding box is at
xits baseline is at
y
The baseline is located along the line the bottom of the text would be written on, excluding letters with tails such as y:
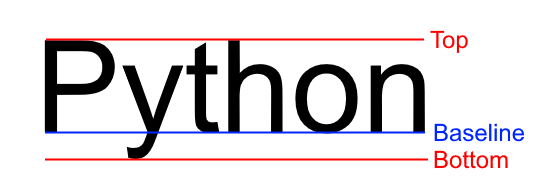
The blue line is the baseline for the string
"Python"rotationallows for the text to be rotated around the anchor point by the passed number of degrees. Positive values rotate clockwise from horizontal, while negative values rotate counter-clockwise: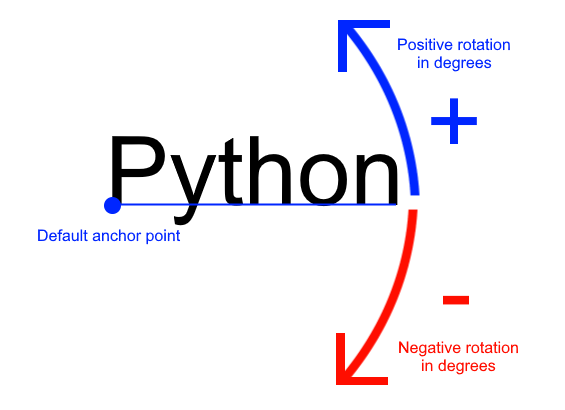
Rotation around the default anchor (
anchor_y="baseline"andanchor_x="left")This class is a wrapper around pyglet’s
pyglet.text.Label. More advanced users can use pyglet’s label directly if preferred.- 🧙 enter(self)[source]
Update multiple attributes of this text, using efficient update mechanism of the underlying
pyglet.Label
- property align: str
Horizontal alignment; values other than
"left"require width to be set.Valid options:
"left","center","right".
- property anchor_y: str
Get or set the vertical anchor.
Options :
"top","bottom","center", or"baseline"
- property bold: bool | str
Get or set bold state of the label.
The supported values include:
"black""bold" (same as ``True)"semibold""semilight""light"
- draw() None[source]
Draw the label to the screen at its current
xandyposition.Warning
Cameras affect text drawing!
If you want to draw a custom GUI that doesn’t move with the game world, you will need a second
Camerainstance. For information on how to do this, see Move with a Scrolling Screen - Centered.
- draw_debug(anchor_color: tuple[int, int, int] | tuple[int, int, int, int] = (255, 0, 0, 255), background_color: tuple[int, int, int] | tuple[int, int, int, int] = (0, 0, 139, 255), outline_color: tuple[int, int, int] | tuple[int, int, int, int] = (255, 255, 255, 255)) None[source]
Draw test with debug geometry showing the content area, outline and the anchor point.
- Parameters:
anchor_color – Color of the anchor point
background_color – Color the content background
outline_color – Color of the content outline
- em_to_px(em: float) float[source]
Convert from an em value to a pixel amount.
1em is defined as
font_sizept.
- property group: Group | None
The specific group in a batch the text should belong to.
This is normally not necessary to specify unless you are batching very large sets of text needing to separate into groups or even mix with other pyglet batch content.
- property height: int | None
Get or set the height of the label in pixels.
This value affects text flow when multiline text is used. If you are looking for the physical size if the text, see
content_height
- initialize() None[source]
Manually initialize the Text if it was lazy loaded. This has no effect if the Text was already initialized.
- property position: tuple[float | int, float | int] | Vec2 | tuple[float | int, float | int, float | int] | Vec3
The current x, y position as a tuple.
This is faster than setting x and y position separately because the underlying geometry only needs to change position once.
- px_to_em(px: float) float[source]
Convert from a pixel amount to a value in ems.
1em is defined as
font_sizept.
- property rect: Rect
Rect representing the bounds of the text.
Tip
Don’t worry about width being None.
Although a label can be created with a width=None: * The underlying
pygletlabel will have bounding dimensions * This rect is for on-screen click and layout purposes, not maximum possible width
- property size
Get the size of the label.
- property text: str
Get or set the current text string to display.
The value assigned will be converted to a string.
This is an alias for
value
- property tracking: float | None
Get/set the tracking amount for this text object, or rather, the added space between each character.
The value is an amount in pixels and can be negative. To convert from the em unit, use Text.em_to_px().
- Returns:
a pixel amount, or None if the tracking is inconsistent.
- property value: str
Get or set the current text string to display.
The value assigned will be converted to a string.
- property visible: bool
Whether the text is visible or not.
This is a property of the underlying pyglet.Label.
- property width: int | None
Get or set the width of the label in pixels.
This value affects text flow when multiline text is used. If you are looking for the physical size if the text, see
content_width
- arcade.load_font(path: str | Path) None[source]
Load fonts in a file (usually .ttf) adding them to a global font registry.
A file can contain one or multiple fonts. Each font has a name. Open the font file to find the actual name(s). These names are used to select font when drawing text.
Examples:
# Load a font in the current working directory
# (absolute path is often better)
arcade.load_font("Custom.ttf")
# Load a font using a custom resource handle
arcade.load_font(":font:Custom.ttf")
- Parameters:
path – Path to the font file
- Raises:
FileNotFoundError – if the font specified wasn’t found
- arcade.create_text_sprite(text: str, color: tuple[int, int, int] | tuple[int, int, int, int] = (255, 255, 255, 255), font_size: float = 12.0, width: int | None = None, align: str = 'left', font_name: str | tuple[str, ...] = ('calibri', 'arial'), bold: bool | str = False, italic: bool = False, anchor_x: str = 'left', multiline: bool = False, texture_atlas: TextureAtlasBase | None = None, background_color: tuple[int, int, int] | tuple[int, int, int, int] | None = None) Sprite[source]
Creates a sprite containing text based off of
Text.Internally this creates a Text object and an empty texture. It then uses either the provided texture atlas, or gets the default one, and draws the Text object into the texture atlas.
It then creates a sprite referencing the newly created texture, and positions it accordingly, and that is final result that is returned from the function.
If you are providing a custom texture atlas, something important to keep in mind is that the resulting Sprite can only be added to SpriteLists which use that atlas. If it is added to a SpriteList which uses a different atlas, you will likely just see a black box drawn in its place.
- Parameters:
text – Initial text to display. Can be an empty string
color – Color of the text as an RGBA tuple or a
Colorinstance.font_size – Size of the text in points
width – A width limit in pixels
align – Horizontal alignment; values other than “left” require width to be set. Valid options:
"left","center","right".font_name – A font name, path to a font file, or list of names
bold – Whether to draw the text as bold, and if a string, how bold. See
arcade.gui.widgets.text.boldto learn more.italic – Whether to draw the text as italic
anchor_x – How to calculate the anchor point’s x coordinate. Options: “left”, “center”, or “right”
multiline – Requires width to be set; enables word wrap rather than clipping
background_color – The background color of the text. If None, the background will be transparent.
texture_atlas – The texture atlas to use for the newly created texture. The default global atlas will be used if this is None.
- arcade.draw_text(text: Any, x: float, y: float, color: tuple[int, int, int] | tuple[int, int, int, int] = (255, 255, 255, 255), font_size: float = 12.0, width: int | None = None, align: str = 'left', font_name: str | tuple[str, ...] = ('calibri', 'arial'), bold: bool | str = False, italic: bool = False, anchor_x: str = 'left', anchor_y: str = 'baseline', multiline: bool = False, rotation: float = 0, z: float = 0)[source]
A simple way for beginners to draw text.
Warning
Use
arcade.Textobjects instead.This method of drawing text is very slow and might be removed in the near future. Text objects can be 10-100 times faster depending on the use case.
Warning
Cameras affect text drawing!
If you want to draw a custom GUI that doesn’t move with the game world, you will need a second camera. For information on how to do this, see Move with a Scrolling Screen - Centered.
This function lets you start draw text easily with better performance than the old pillow-based text. If you need even higher performance, consider using
Text.Example code can be found at Slow but Easy Text Drawing.
- Parameters:
text – Initial text to display. Can be an empty string
x – x position to align the text’s anchor point with
y – y position to align the text’s anchor point with
z – z position to align the text’s anchor point with
color – Color of the text as an RGBA tuple or a
Colorinstance.font_size – Size of the text in points
width – A width limit in pixels
align – Horizontal alignment; values other than “left” require width to be set. Valid options:
"left","center","right".font_name – A font name, path to a font file, or list of names
bold – Whether to draw the text as bold, and if a string, how bold. See
arcade.gui.widgets.text.boldto learn more.italic – Whether to draw the text as italic
anchor_x – How to calculate the anchor point’s x coordinate. Options: “left”, “center”, or “right”
anchor_y – How to calculate the anchor point’s y coordinate. Options: “top”, “bottom”, “center”, or “baseline”.
multiline – Requires width to be set; enables word wrap rather than clipping
rotation – rotation in degrees, clockwise from horizontal
By default, the text is placed so that:
the left edge of its bounding box is at
xits baseline is at
y
The baseline of text is the line it would be written on:
The blue line is the baseline for the string
"Python"font_namecan be any of the following:a built-in font in the Built-In Resources
the name of a system font
a path to a font on the system
a tuple containing any mix of the previous three
Each entry provided will be tried in order until one is found. If none of the fonts are found, a default font will be chosen (usually Arial).
anchor_xandanchor_yspecify how to calculate the anchor point, which affects how the text is:Placed relative to
xandyRotated
By default, the text is drawn so that
xis at the left of the text’s bounding box andyis at the baseline.You can set a custom anchor point by passing combinations of the following values for
anchor_xandanchor_y:Values allowed by anchor_xString value
Practical Effect
Anchor Position
"left"(default)Text drawn with its left side at
xAnchor point on the left side of the text’s bounding box
"center"Text drawn horizontally centered on
xAnchor point at horizontal center of text’s bounding box
"right"Text drawn with its right side at
xAnchor placed on the right side of the text’s bounding box
Values allowed by anchor_yString value
Practical Effect
Anchor Position
"baseline"(default)Text drawn with baseline on
y.Anchor placed at the text rendering baseline
"top"Text drawn with its top aligned with
yAnchor point placed at the top of the text
"bottom"Text drawn with its absolute bottom aligned with
y, including the space for tails on letters such as y and gAnchor point placed at the bottom of the text after the space allotted for letters such as y and g
"center"Text drawn with its vertical center on
yAnchor placed at the vertical center of the text
rotationallows for the text to be rotated around the anchor point by the passed number of degrees. Positive values rotate clockwise from horizontal, while negative values rotate counter-clockwise:
Rotation around the default anchor point (
anchor_y="baseline"andanchor_x="left")It can be helpful to think of this function working as follows:
Text layout and alignment are calculated:
The text’s characters are laid out within a bounding box according to the current styling options
The anchor point on the text is calculated based on the text value, styling, as well as values for
anchor_xandanchor_y
The text is placed so its anchor point is at
(x,
y))
The text is rotated around its anchor point before finally being drawn
This function is less efficient than using
Textbecause some steps above can be repeated each time a call is made rather than fully cached as with the class.