Pymunk Platformer
This tutorial covers how to write a platformer using Arcade and its Pymunk API. This tutorial assumes the you are somewhat familiar with Python, Arcade, and the Tiled Map Editor.
If you aren’t familiar with programming in Python, check out https://learn.arcade.academy
If you aren’t familiar with the Arcade library, work through the Simple Platformer.
If you aren’t familiar with the Tiled Map Editor, the Simple Platformer also introduces how to create a map with the Tiled Map Editor.
Common Issues
There are a few items with the Pymunk physics engine that should be pointed out before you get started:
Object overlap - A fast moving object is allowed to overlap with the object it collides with, and Pymunk will push them apart later. See collision bias for more information.
Pass-through - A fast moving object can pass through another object if its speed is so quick it never overlaps the other object between frames. See object tunneling.
When stepping the physics engine forward in time, the default is to move forward 1/60th of a second. Whatever increment is picked, increments should always be kept the same. Don’t use the variable delta_time from the
updatemethod as a unit, or results will be unstable and unpredictable. For a more accurate simulation, you can step forward 1/120th of a second twice per frame. This increases the time required, but takes more time to calculate.A sprite moving across a floor made up of many rectangles can get “caught” on the edges. The corner of the player sprite can get caught the corner of the floor sprite. To get around this, make sure the hit box for the bottom of the player sprite is rounded. Also, look into the possibility of merging horizontal rows of sprites.
Open a Window
To begin with, let’s start with a program that will use Arcade to open a blank window. It also has stubs for methods we’ll fill in later. Try this code and make sure you can run it. It should pop open a black window.
 1"""
 2Example of Pymunk Physics Engine Platformer
 3"""
 4import arcade
 5
 6SCREEN_TITLE = "PyMunk Platformer"
 7
 8# Size of screen to show, in pixels
 9SCREEN_WIDTH = 800
10SCREEN_HEIGHT = 600
11
12
13class GameWindow(arcade.Window):
14    """ Main Window """
15
16    def __init__(self, width, height, title):
17        """ Create the variables """
18
19        # Init the parent class
20        super().__init__(width, height, title)
21
22    def setup(self):
23        """ Set up everything with the game """
24        pass
25
26    def on_key_press(self, key, modifiers):
27        """Called whenever a key is pressed. """
28        pass
29
30    def on_key_release(self, key, modifiers):
31        """Called when the user releases a key. """
32        pass
33
34    def on_update(self, delta_time):
35        """ Movement and game logic """
36        pass
37
38    def on_draw(self):
39        """ Draw everything """
40        self.clear()
41
42
43def main():
44    """ Main function """
45    window = GameWindow(SCREEN_WIDTH, SCREEN_HEIGHT, SCREEN_TITLE)
46    window.setup()
47    arcade.run()
48
49
50if __name__ == "__main__":
51    main()
Create Constants
Now let’s set up the import statements, and define the constants we are going
to use. In this case, we’ve got sprite tiles that are 128x128 pixels. They are
scaled down to 50% of the width and 50% of the height (scale of 0.5). The screen
size is set to 25x15 grid.
To keep things simple, this example will not scroll the screen with the player. See Simple Platformer or Move with a Scrolling Screen - Centered.
When you run this program, the screen should be larger.
 1"""
 2Example of Pymunk Physics Engine Platformer
 3"""
 4import arcade
 5
 6SCREEN_TITLE = "PyMunk Platformer"
 7
 8# How big are our image tiles?
 9SPRITE_IMAGE_SIZE = 128
10
11# Scale sprites up or down
12SPRITE_SCALING_PLAYER = 0.5
13SPRITE_SCALING_TILES = 0.5
14
15# Scaled sprite size for tiles
16SPRITE_SIZE = int(SPRITE_IMAGE_SIZE * SPRITE_SCALING_PLAYER)
17
18# Size of grid to show on screen, in number of tiles
19SCREEN_GRID_WIDTH = 25
20SCREEN_GRID_HEIGHT = 15
21
22# Size of screen to show, in pixels
23SCREEN_WIDTH = SPRITE_SIZE * SCREEN_GRID_WIDTH
24SCREEN_HEIGHT = SPRITE_SIZE * SCREEN_GRID_HEIGHT
25
26
27class GameWindow(arcade.Window):
28    """ Main Window """
29
Create Instance Variables
Next, let’s create instance variables we are going to use, and set a background
color that’s green: arcade.color.AMAZON
If you aren’t familiar with type-casting on Python, you might not be familiar with lines of code like this:
self.player_list: Optional[arcade.SpriteList] = None
This means the player_list attribute is going to be an instance of
SpriteList or None. If you don’t want to mess with typing, then
this code also works just as well:
self.player_list = None
Running this program should show the same window, but with a green background.
 1
 2class GameWindow(arcade.Window):
 3    """Main Window"""
 4
 5    def __init__(self, width, height, title):
 6        """Create the variables"""
 7
 8        # Init the parent class
 9        super().__init__(width, height, title)
10
11        # Player sprite
12        self.player_sprite: arcade.Sprite | None = None
13
14        # Sprite lists we need
15        self.player_list: arcade.SpriteList | None = None
16        self.wall_list: arcade.SpriteList | None = None
17        self.bullet_list: arcade.SpriteList | None = None
18        self.item_list: arcade.SpriteList | None = None
19
20        # Track the current state of what key is pressed
21        self.left_pressed: bool = False
22        self.right_pressed: bool = False
23
24        # Set background color
Load and Display Map
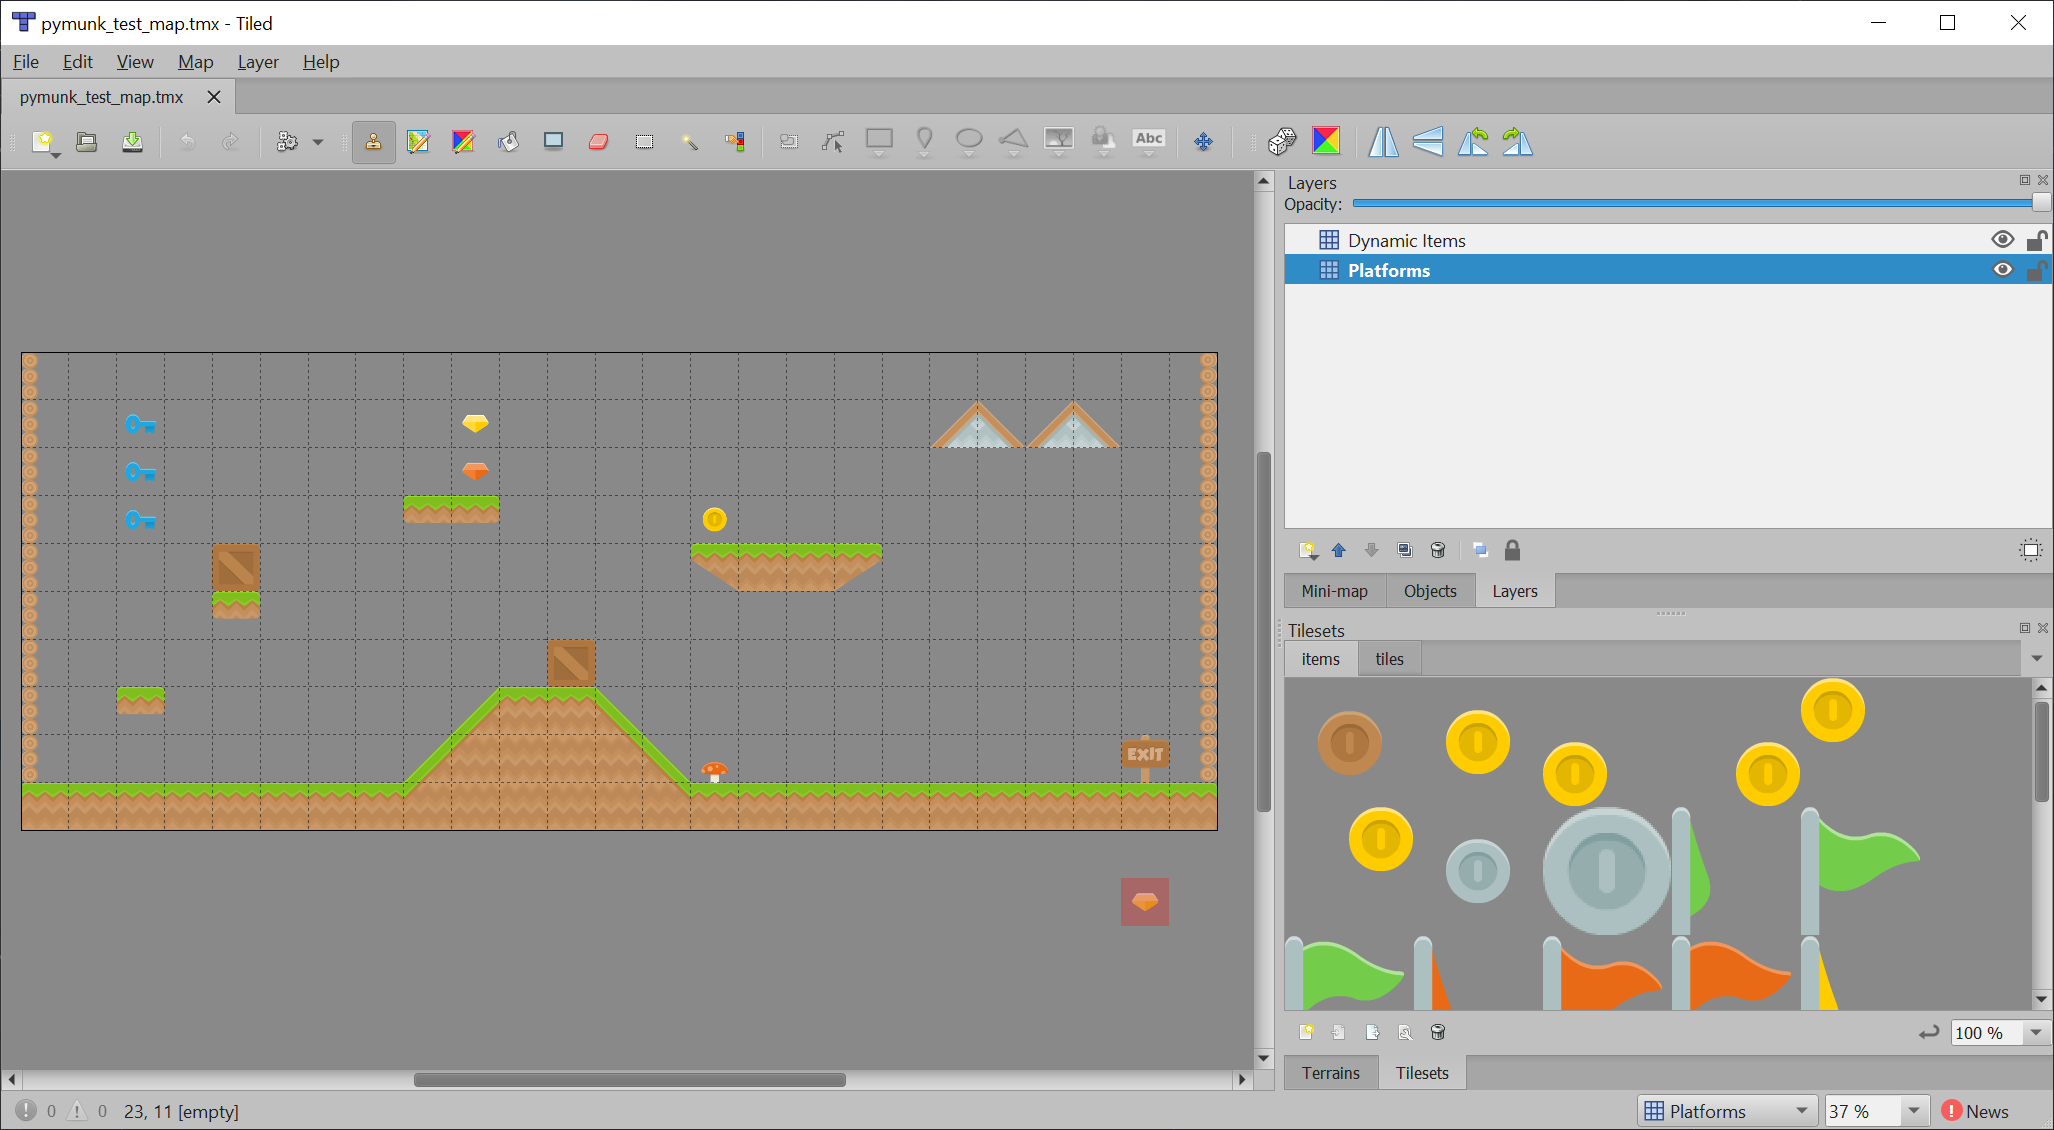
To get started, create a map with the Tiled Map Editor. Place items that you don’t want to move, and to act as platforms in a layer named “Platforms”. Place items you want to push around in a layer called “Dynamic Items”. Name the file “pymunk_test_map.tmx” and place in the exact same directory as your code.
If you aren’t sure how to use the Tiled Map Editor, see Step 8 - Collecting Coins.
Now, in the setup function, we are going add code to:
Create instances of
SpriteListfor each group of sprites we are doing to work with.Create the player sprite.
Read in the tiled map.
Make sprites from the layers in the tiled map.
Note
When making sprites from the tiled map layer, the name of the layer you load must match exactly with the layer created in the tiled map editor. It is case-sensitive.
 1    def setup(self):
 2        """Set up everything with the game"""
 3
 4        # Create the sprite lists
 5        self.player_list = arcade.SpriteList()
 6        self.bullet_list = arcade.SpriteList()
 7
 8        # Map name
 9        map_name = ":resources:/tiled_maps/pymunk_test_map.json"
10
11        # Load in TileMap
12        tile_map = arcade.load_tilemap(map_name, SPRITE_SCALING_TILES)
13
14        # Pull the sprite layers out of the tile map
15        self.wall_list = tile_map.sprite_lists["Platforms"]
16        self.item_list = tile_map.sprite_lists["Dynamic Items"]
17
18        # Create player sprite
19        self.player_sprite = arcade.Sprite(
20            ":resources:images/animated_characters/female_person/femalePerson_idle.png",
21            SPRITE_SCALING_PLAYER,
22        )
23        # Set player location
24        grid_x = 1
25        grid_y = 1
26        self.player_sprite.center_x = SPRITE_SIZE * grid_x + SPRITE_SIZE / 2
27        self.player_sprite.center_y = SPRITE_SIZE * grid_y + SPRITE_SIZE / 2
28        # Add to player sprite list
29        self.player_list.append(self.player_sprite)
There’s no point in having sprites if we don’t draw them, so in the on_draw
method, let’s draw out sprite lists.
1    def on_draw(self):
2        """Draw everything"""
3        self.clear()
4        self.wall_list.draw()
5        self.bullet_list.draw()
6        self.item_list.draw()
7        self.player_list.draw()
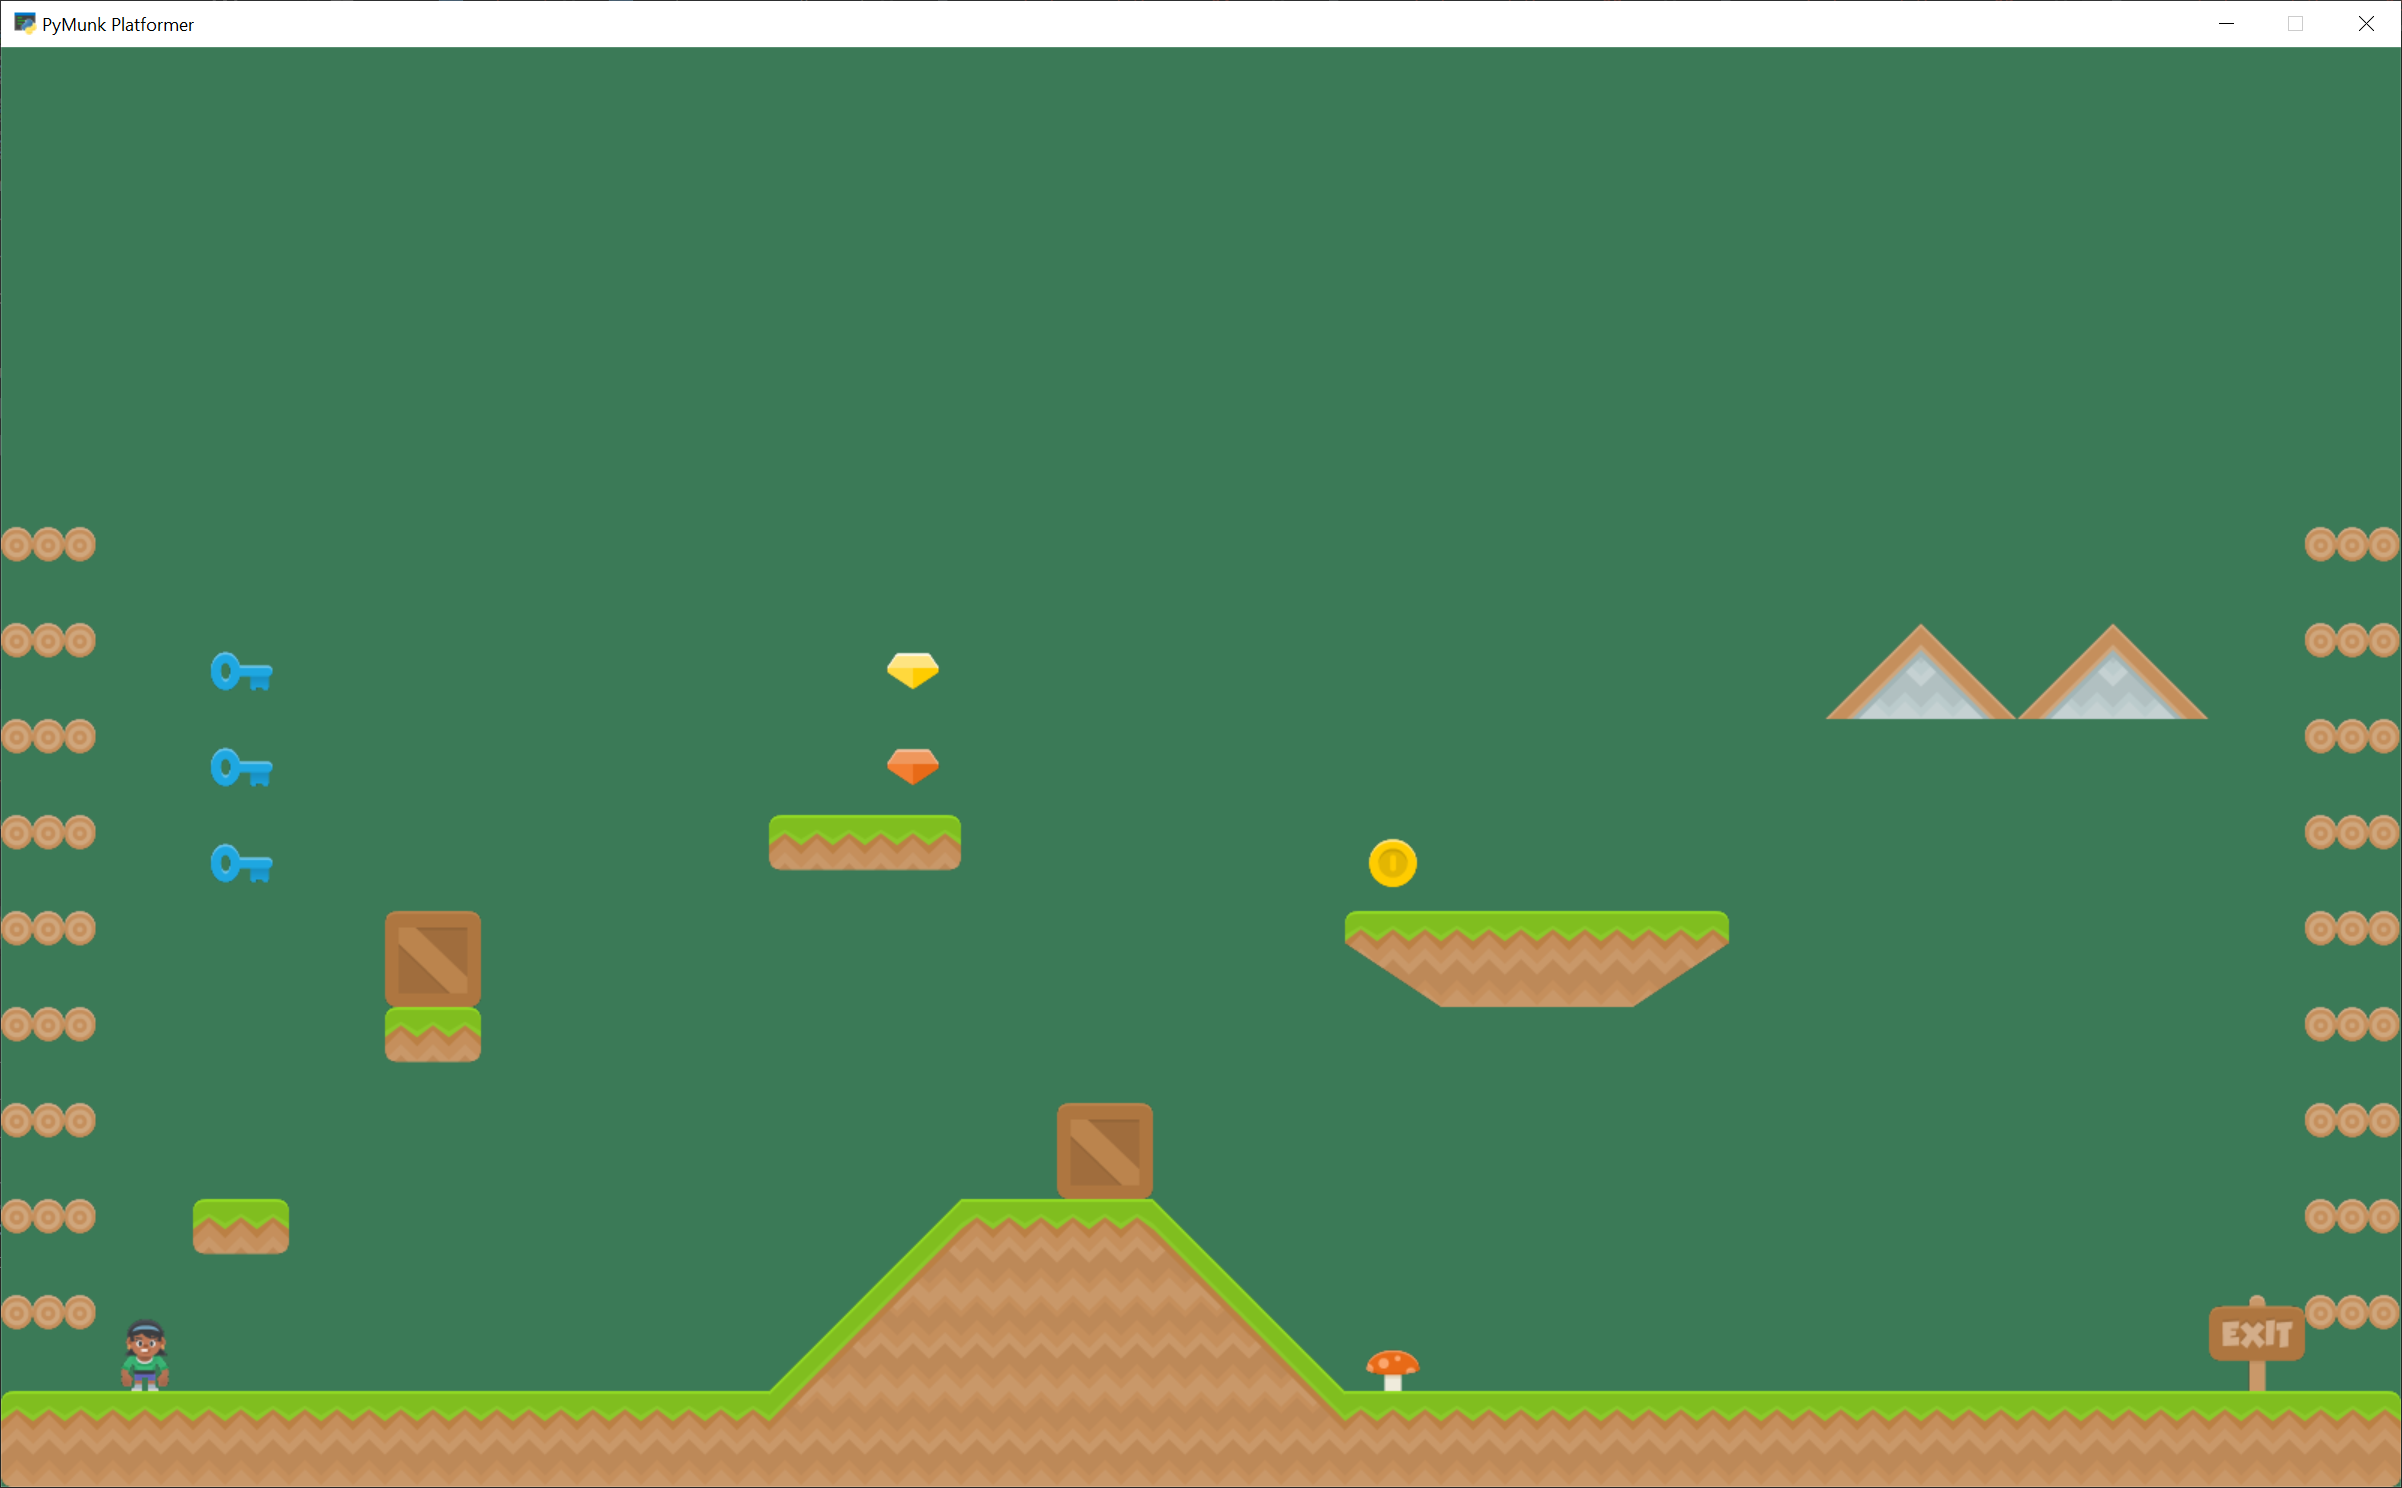
With the additions in the program below, running your program should show the tiled map you created:
Add Physics Engine
The next step is to add in the physics engine.
First, add some constants for our physics. Here we are setting:
A constant for the force of gravity.
Values for “damping”. A damping of 1.0 will cause an item to lose all it’s velocity once a force no longer applies to it. A damping of 0.5 causes 50% of speed to be lost in 1 second. A value of 0 is free-fall.
Values for friction. 0.0 is ice, 1.0 is like rubber.
Mass. Item default to 1. We make the player 2, so she can push items around easier.
Limits are the players horizontal and vertical speed. It is easier to play if the player is limited to a constant speed. And more realistic, because they aren’t on wheels.
 1
 2# --- Physics forces. Higher number, faster accelerating.
 3
 4# Gravity
 5GRAVITY = 1500
 6
 7# Damping - Amount of speed lost per second
 8DEFAULT_DAMPING = 1.0
 9PLAYER_DAMPING = 0.4
10
11# Friction between objects
12PLAYER_FRICTION = 1.0
13WALL_FRICTION = 0.7
14DYNAMIC_ITEM_FRICTION = 0.6
15
16# Mass (defaults to 1)
17PLAYER_MASS = 2.0
18
19# Keep player from going too fast
20PLAYER_MAX_HORIZONTAL_SPEED = 450
Second, add the following attributer in the __init__ method to hold our
physics engine:
1
2        # Physics engine
Third, in the setup method we create the physics engine and add the sprites.
The player, walls, and dynamic items all have different properties so they are
added individually.
 1        grid_y = 1
 2        self.player_sprite.center_x = SPRITE_SIZE * grid_x + SPRITE_SIZE / 2
 3        self.player_sprite.center_y = SPRITE_SIZE * grid_y + SPRITE_SIZE / 2
 4        # Add to player sprite list
 5        self.player_list.append(self.player_sprite)
 6
 7        # --- Pymunk Physics Engine Setup ---
 8
 9        # The default damping for every object controls the percent of velocity
10        # the object will keep each second. A value of 1.0 is no speed loss,
11        # 0.9 is 10% per second, 0.1 is 90% per second.
12        # For top-down games, this is basically the friction for moving objects.
13        # For platformers with gravity, this should probably be set to 1.0.
14        # Default value is 1.0 if not specified.
15        damping = DEFAULT_DAMPING
16
17        # Set the gravity. (0, 0) is good for outer space and top-down.
18        gravity = (0, -GRAVITY)
19
20        # Create the physics engine
21        self.physics_engine = arcade.PymunkPhysicsEngine(damping=damping, gravity=gravity)
22
23        # Add the player.
24        # For the player, we set the damping to a lower value, which increases
25        # the damping rate. This prevents the character from traveling too far
26        # after the player lets off the movement keys.
27        # Setting the moment of inertia to PymunkPhysicsEngine.MOMENT_INF prevents it from
28        # rotating.
29        # Friction normally goes between 0 (no friction) and 1.0 (high friction)
30        # Friction is between two objects in contact. It is important to remember
31        # in top-down games that friction moving along the 'floor' is controlled
32        # by damping.
33        self.physics_engine.add_sprite(
34            self.player_sprite,
35            friction=PLAYER_FRICTION,
36            mass=PLAYER_MASS,
37            moment_of_inertia=arcade.PymunkPhysicsEngine.MOMENT_INF,
38            collision_type="player",
39            max_horizontal_velocity=PLAYER_MAX_HORIZONTAL_SPEED,
40            max_vertical_velocity=PLAYER_MAX_VERTICAL_SPEED,
41        )
42
43        # Create the walls.
44        # By setting the body type to PymunkPhysicsEngine.STATIC the walls can't
45        # move.
46        # Movable objects that respond to forces are PymunkPhysicsEngine.DYNAMIC
47        # PymunkPhysicsEngine.KINEMATIC objects will move, but are assumed to be
48        # repositioned by code and don't respond to physics forces.
49        # Dynamic is default.
50        self.physics_engine.add_sprite_list(
51            self.wall_list,
Fourth, in the on_update method we call the physics engine’s step method.
1        pass
2
3    def on_key_release(self, key, modifiers):
If you run the program, and you have dynamic items that are up in the air, you should see them fall when the game starts.
Add Player Movement
Next step is to get the player moving. In this section we’ll cover how to move left and right. In the next section we’ll show how to jump.
The force that we will move the player is defined as PLAYER_MOVE_FORCE_ON_GROUND.
We’ll apply a different force later, if the player happens to be airborne.
 1# Force applied while on the ground
 2PLAYER_MOVE_FORCE_ON_GROUND = 8000
 3
 4
 5class GameWindow(arcade.Window):
 6    """Main Window"""
 7
 8    def __init__(self, width, height, title):
 9        """Create the variables"""
10
11        # Init the parent class
12        super().__init__(width, height, title)
13
14        # Player sprite
15        self.player_sprite: arcade.Sprite | None = None
16
17        # Sprite lists we need
18        self.player_list: arcade.SpriteList | None = None
19        self.wall_list: arcade.SpriteList | None = None
20        self.bullet_list: arcade.SpriteList | None = None
21        self.item_list: arcade.SpriteList | None = None
22
23        # Track the current state of what key is pressed
24        self.left_pressed: bool = False
25        self.right_pressed: bool = False
26
27        # Physics engine
28        self.physics_engine: arcade.PymunkPhysicsEngine | None = None
We need to track if the left/right keys are held down. To do this we define
instance variables left_pressed and right_pressed. These are set to
appropriate values in the key press and release handlers.
 1
 2        # Create the items
 3        self.physics_engine.add_sprite_list(
 4            self.item_list, friction=DYNAMIC_ITEM_FRICTION, collision_type="item"
 5        )
 6
 7    def on_key_press(self, key, modifiers):
 8        """Called whenever a key is pressed."""
 9
10        if key == arcade.key.LEFT:
11            self.left_pressed = True
12        elif key == arcade.key.RIGHT:
13            self.right_pressed = True
14
15    def on_key_release(self, key, modifiers):
Finally, we need to apply the correct force in on_update. Force is specified
in a tuple with horizontal force first, and vertical force second.
We also set the friction when we are moving to zero, and when we are not moving to 1. This is important to get realistic movement.
 1    def on_update(self, delta_time):
 2        """Movement and game logic"""
 3
 4        # Update player forces based on keys pressed
 5        if self.left_pressed and not self.right_pressed:
 6            # Create a force to the left. Apply it.
 7            force = (-PLAYER_MOVE_FORCE_ON_GROUND, 0)
 8            self.physics_engine.apply_force(self.player_sprite, force)
 9            # Set friction to zero for the player while moving
10            self.physics_engine.set_friction(self.player_sprite, 0)
11        elif self.right_pressed and not self.left_pressed:
12            # Create a force to the right. Apply it.
13            force = (PLAYER_MOVE_FORCE_ON_GROUND, 0)
14            self.physics_engine.apply_force(self.player_sprite, force)
15            # Set friction to zero for the player while moving
16            self.physics_engine.set_friction(self.player_sprite, 0)
17        else:
18            # Player's feet are not moving. Therefore up the friction so we stop.
19            self.physics_engine.set_friction(self.player_sprite, 1.0)
Add Player Jumping
To get the player to jump we need to:
Make sure the player is on the ground.
Apply an impulse force to the player upward.
Change the left/right force to the player while they are in the air.
We can see if a sprite has a sprite below it with the is_on_ground function.
Otherwise we’ll be able to jump while we are in the air.
(Double-jumps would allow this once.)
If we don’t allow the player to move left-right while in the air, they player will be very hard to control. If we allow them to move left/right with the same force as on the ground, that’s typically too much. So we’ve got a different left/right force depending if we are in the air or not.
For the code changes, first we’ll define some constants:
1# Force applied when moving left/right in the air
2PLAYER_MOVE_FORCE_IN_AIR = 900
3
4# Strength of a jump
5PLAYER_JUMP_IMPULSE = 1800
We’ll add logic that will apply the impulse force when we jump:
 1    def on_key_press(self, key, modifiers):
 2        """Called whenever a key is pressed. """
 3
 4        if key == arcade.key.LEFT:
 5            self.left_pressed = True
 6        elif key == arcade.key.RIGHT:
 7            self.right_pressed = True
 8        elif key == arcade.key.UP:
 9            # find out if player is standing on ground
10            if self.physics_engine.is_on_ground(self.player_sprite):
11                # She is! Go ahead and jump
12                impulse = (0, PLAYER_JUMP_IMPULSE)
13                self.physics_engine.apply_impulse(self.player_sprite, impulse)
Then we will adjust the left/right force depending on if we are grounded or not:
 1    def on_update(self, delta_time):
 2        """ Movement and game logic """
 3
 4        is_on_ground = self.physics_engine.is_on_ground(self.player_sprite)
 5        # Update player forces based on keys pressed
 6        if self.left_pressed and not self.right_pressed:
 7            # Create a force to the left. Apply it.
 8            if is_on_ground:
 9                force = (-PLAYER_MOVE_FORCE_ON_GROUND, 0)
10            else:
11                force = (-PLAYER_MOVE_FORCE_IN_AIR, 0)
12            self.physics_engine.apply_force(self.player_sprite, force)
13            # Set friction to zero for the player while moving
14            self.physics_engine.set_friction(self.player_sprite, 0)
15        elif self.right_pressed and not self.left_pressed:
16            # Create a force to the right. Apply it.
17            if is_on_ground:
18                force = (PLAYER_MOVE_FORCE_ON_GROUND, 0)
19            else:
20                force = (PLAYER_MOVE_FORCE_IN_AIR, 0)
21            self.physics_engine.apply_force(self.player_sprite, force)
22            # Set friction to zero for the player while moving
23            self.physics_engine.set_friction(self.player_sprite, 0)
24        else:
25            # Player's feet are not moving. Therefore up the friction so we stop.
26            self.physics_engine.set_friction(self.player_sprite, 1.0)
27
Add Player Animation
To create a player animation, we make a custom child class of Sprite.
We load each frame of animation that we need, including a mirror image of it.
We will flip the player to face left or right. If the player is in the air, we’ll also change between a jump up and a falling graphics.
Because the physics engine works with small floating point numbers, it often flips above and below zero by small amounts. It is a good idea not to change the animation as the x and y float around zero. For that reason, in this code we have a “dead zone.” We don’t change the animation until it gets outside of that zone.
We also need to control how far the player moves before we change the walking animation, so that the feet appear in-sync with the ground.
1DEAD_ZONE = 0.1
2
3# Constants used to track if the player is facing left or right
4RIGHT_FACING = 0
5LEFT_FACING = 1
6
7# How many pixels to move before we change the texture in the walking animation
8DISTANCE_TO_CHANGE_TEXTURE = 20
9
Next, we create a Player class that is a child to Sprite. This
class will update the player animation.
The __init__ method loads all of the textures. Here we use Kenney.nl’s
Toon Characters 1 pack.
It has six different characters you can choose from with the same layout, so
it makes changing as simple as changing which line is enabled. There are
eight textures for walking, and textures for idle, jumping, and falling.
As the character can face left or right, we prepare a standard and mirrored
version of each texture by using flip_left_right().
For the multi-frame walking animation, we use an “odometer.” We need to move a certain number of pixels before changing the animation. If this value is too small our character moves her legs like Fred Flintstone, too large and it looks like you are ice skating. We keep track of the index of our current texture, 0-7 since there are eight of them.
Any sprite moved by the Pymunk engine will have its pymunk_moved method
called. This can be used to update the animation.
 1class PlayerSprite(arcade.Sprite):
 2    """Player Sprite"""
 3
 4    def __init__(self):
 5        """Init"""
 6        # Let parent initialize
 7        super().__init__(scale=SPRITE_SCALING_PLAYER)
 8
 9        # Images from Kenney.nl's Character pack
10        # main_path = ":resources:images/animated_characters/female_adventurer/femaleAdventurer"
11        main_path = ":resources:images/animated_characters/female_person/femalePerson"
12        # main_path = ":resources:images/animated_characters/male_person/malePerson"
13        # main_path = ":resources:images/animated_characters/male_adventurer/maleAdventurer"
14        # main_path = ":resources:images/animated_characters/zombie/zombie"
15        # main_path = ":resources:images/animated_characters/robot/robot"
16
17        # Load textures for idle, jump, and fall states
18        idle_texture = arcade.load_texture(f"{main_path}_idle.png")
19        jump_texture = arcade.load_texture(f"{main_path}_jump.png")
20        fall_texture = arcade.load_texture(f"{main_path}_fall.png")
21        # Make pairs of textures facing left and right
22        self.idle_texture_pair = idle_texture, idle_texture.flip_left_right()
23        self.jump_texture_pair = jump_texture, jump_texture.flip_left_right()
24        self.fall_texture_pair = fall_texture, fall_texture.flip_left_right()
25
26        # Load textures for walking and make pairs of textures facing left and right
27        self.walk_textures = []
28        for i in range(8):
29            texture = arcade.load_texture(f"{main_path}_walk{i}.png")
30            self.walk_textures.append((texture, texture.flip_left_right()))
31
32        # Set the initial texture
33        self.texture = self.idle_texture_pair[0]
34
35        # Default to face-right
36        self.character_face_direction = RIGHT_FACING
37
38        # Index of our current texture
39        self.cur_texture = 0
40
41        # How far have we traveled horizontally since changing the texture
42        self.x_odometer = 0
43
44    def pymunk_moved(self, physics_engine, dx, dy, d_angle):
45        """Handle being moved by the pymunk engine"""
46        # Figure out if we need to face left or right
47        if dx < -DEAD_ZONE and self.character_face_direction == RIGHT_FACING:
48            self.character_face_direction = LEFT_FACING
49        elif dx > DEAD_ZONE and self.character_face_direction == LEFT_FACING:
50            self.character_face_direction = RIGHT_FACING
51
52        # Are we on the ground?
53        is_on_ground = physics_engine.is_on_ground(self)
54
55        # Add to the odometer how far we've moved
56        self.x_odometer += dx
57
58        # Jumping animation
59        if not is_on_ground:
60            if dy > DEAD_ZONE:
61                self.texture = self.jump_texture_pair[self.character_face_direction]
62                return
63            elif dy < -DEAD_ZONE:
64                self.texture = self.fall_texture_pair[self.character_face_direction]
65                return
66
67        # Idle animation
68        if abs(dx) <= DEAD_ZONE:
69            self.texture = self.idle_texture_pair[self.character_face_direction]
70            return
71
72        # Have we moved far enough to change the texture?
73        if abs(self.x_odometer) > DISTANCE_TO_CHANGE_TEXTURE:
74            # Reset the odometer
75            self.x_odometer = 0
76
77            # Advance the walking animation
78            self.cur_texture += 1
79            if self.cur_texture > 7:
80                self.cur_texture = 0
81            self.texture = self.walk_textures[self.cur_texture][self.character_face_direction]
Important! At this point, we are still creating an instance of Sprite
and not PlayerSprite. We need to go back to the setup method and
replace the line that creates the player instance with:
# Create player sprite
A really common mistake I’ve seen programmers make (and made myself) is to forget that last part. Then you can spend a lot of time looking at the player class when the error is in the setup.
We also need to go back and change the data type for the player sprite attribute
in our __init__ method:
# Player sprite
Shoot Bullets
Getting the player to shoot something can add a lot to our game. To begin with we’ll define a few constants to use. How much force to shoot the bullet with, the bullet’s mass, and the gravity to use for the bullet.
If we use the same gravity for the bullet as everything else, it tends to drop too fast. We could set this to zero if we wanted it to not drop at all.
1
2# How much force to put on the bullet
3BULLET_MOVE_FORCE = 4500
4
5# Mass of the bullet
6BULLET_MASS = 0.1
7
8# Make bullet less affected by gravity
Next, we’ll put in a mouse press handler to put in the bullet shooting code.
We need to:
Create the bullet sprite
We need to calculate the angle from the player to the mouse click
Create the bullet away from the player in the proper direction, as spawning it inside the player will confuse the physics engine
Add the bullet to the physics engine
Apply the force to the bullet to make if move. Note that as we angled the bullet we don’t need to angle the force.
Warning
Does your platformer scroll?
If your window scrolls, you need to add in the coordinate off-set or else the angle calculation will be incorrect.
Warning
Bullets don’t disappear yet!
If the bullet flies off-screen, it doesn’t go away and the physics engine still has to track it.
 1    def on_mouse_press(self, x, y, button, modifiers):
 2        """ Called whenever the mouse button is clicked. """
 3
 4        bullet = arcade.SpriteSolidColor(width=20, height=5, color=arcade.color.DARK_YELLOW)
 5        self.bullet_list.append(bullet)
 6
 7        # Position the bullet at the player's current location
 8        start_x = self.player_sprite.center_x
 9        start_y = self.player_sprite.center_y
10        bullet.position = self.player_sprite.position
11
12        # Get from the mouse the destination location for the bullet
13        # IMPORTANT! If you have a scrolling screen, you will also need
14        # to add in self.view_bottom and self.view_left.
15        dest_x = x
16        dest_y = y
17
18        # Do math to calculate how to get the bullet to the destination.
19        # Calculation the angle in radians between the start points
20        # and end points. This is the angle the bullet will travel.
21        x_diff = dest_x - start_x
22        y_diff = dest_y - start_y
23        angle = math.atan2(y_diff, x_diff)
24
25        # What is the 1/2 size of this sprite, so we can figure out how far
26        # away to spawn the bullet
27        size = max(self.player_sprite.width, self.player_sprite.height) / 2
28
29        # Use angle to to spawn bullet away from player in proper direction
30        bullet.center_x += size * math.cos(angle)
31        bullet.center_y += size * math.sin(angle)
32
33        # Set angle of bullet
34        bullet.angle = math.degrees(angle)
35
36        # Gravity to use for the bullet
37        # If we don't use custom gravity, bullet drops too fast, or we have
38        # to make it go too fast.
39        # Force is in relation to bullet's angle.
40        bullet_gravity = (0, -BULLET_GRAVITY)
41
42        # Add the sprite. This needs to be done AFTER setting the fields above.
43        self.physics_engine.add_sprite(bullet,
44                                       mass=BULLET_MASS,
45                                       damping=1.0,
46                                       friction=0.6,
47                                       collision_type="bullet",
48                                       gravity=bullet_gravity,
49                                       elasticity=0.9)
50
51        # Add force to bullet
52        force = (BULLET_MOVE_FORCE, 0)
53        self.physics_engine.apply_force(bullet, force)
Destroy Bullets and Items
This section has two goals:
Get rid of the bullet if it flies off-screen
Handle collisions of the bullet and other items
Destroy Bullet If It Goes Off-Screen
First, we’ll create a custom bullet class. This class will define the
pymunk_moved method, and check our location each time the bullet moves.
If our y value is too low, we’ll remove the bullet.
1class BulletSprite(arcade.SpriteSolidColor):
2    """ Bullet Sprite """
3    def pymunk_moved(self, physics_engine, dx, dy, d_angle):
4        """ Handle when the sprite is moved by the physics engine. """
5        # If the bullet falls below the screen, remove it
6        if self.center_y < -100:
7            self.remove_from_sprite_lists()
And, of course, once we create the bullet we have to update our code to use
it instead of the plain Sprite class.
1
2        bullet = BulletSprite(width=20, height=5, color=arcade.color.DARK_YELLOW)
3        self.bullet_list.append(bullet)
4
5        # Position the bullet at the player's current location
6        start_x = self.player_sprite.center_x
Handle Collisions
To handle collisions, we can add custom collision handler call-backs. If you’ll remember when we added items to the physics engine, we gave each item a collision type, such as “wall” or “bullet” or “item”. We can write a function and register it to handle all bullet/wall collisions.
In this case, bullets that hit a wall go away. Bullets that hit items cause both the item and the bullet to go away. We could also add code to track damage to a sprite, only removing it after so much damage was applied. Even changing the texture depending on its health.
 1
 2        def wall_hit_handler(bullet_sprite, _wall_sprite, _arbiter, _space, _data):
 3            """ Called for bullet/wall collision """
 4            bullet_sprite.remove_from_sprite_lists()
 5
 6        self.physics_engine.add_collision_handler("bullet", "wall", post_handler=wall_hit_handler)
 7
 8        def item_hit_handler(bullet_sprite, item_sprite, _arbiter, _space, _data):
 9            """ Called for bullet/wall collision """
10            bullet_sprite.remove_from_sprite_lists()
11            item_sprite.remove_from_sprite_lists()
12
Add Moving Platforms
We can add support for moving platforms. Platforms can be added in an object layer. An object layer allows platforms to be placed anywhere, and not just on exact grid locations. Object layers also allow us to add custom properties for each tile we place.
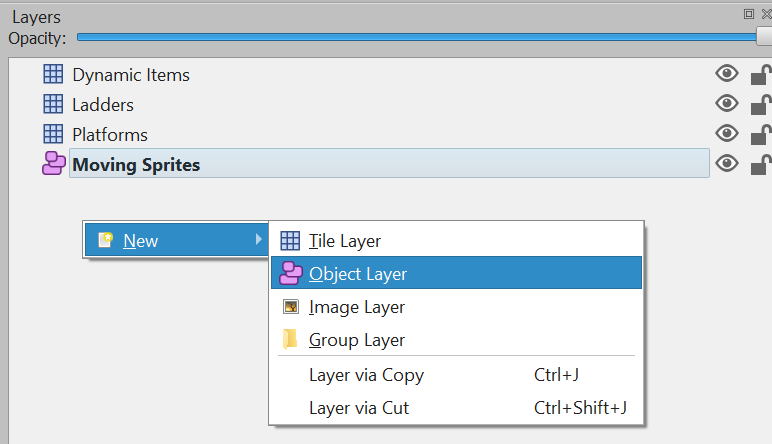
Adding an object layer.
Once we have the tile placed, we can add custom properties for it. Click the ‘+’ icon and add properties for all or some of:
change_xchange_yleft_boundaryright_boundarytop_boundarybottom_boundary
If these are named exact matches, they’ll automatically copy their values into the sprite attributes of the same name.
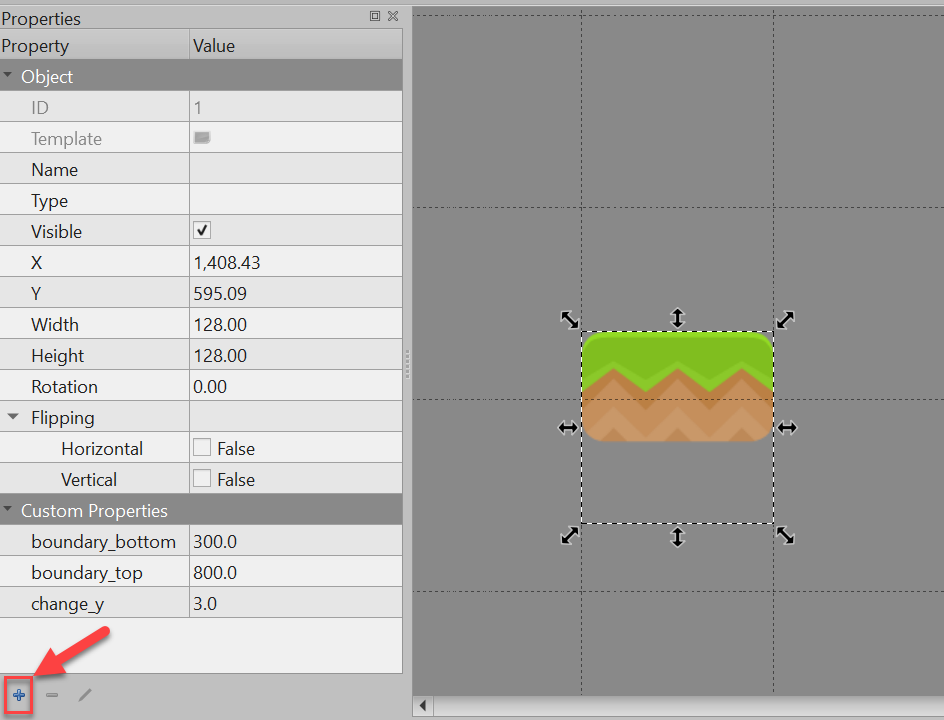
Adding custom properties.
Now we need to update our code. In GameWindow.__init__ add a line to create
an attribute for moving_sprites_list:
self.bullet_list: arcade.SpriteList|None = None
In the setup method, load in the sprite list from the tmx layer.
# --- Pymunk Physics Engine Setup ---
Also in the setup method, we need to add these sprites to the physics engine.
In this case we’ll add the sprites as KINEMATIC. Static sprites don’t move.
Dynamic sprites move, and can have forces applied to them by other objects.
Kinematic sprites do move, but aren’t affected by other objects.
                                            collision_type="item")

        # Add kinematic sprites
We need to draw the moving platform sprites. After adding this line, you should be able to run the program and see the sprites from this layer, even if they don’t move yet.
1    def on_draw(self):
2        """ Draw everything """
3        self.clear()
4        self.wall_list.draw()
5        self.moving_sprites_list.draw()
6        self.bullet_list.draw()
7        self.item_list.draw()
8        self.player_list.draw()
Next up, we need to get the sprites moving. First, we’ll check to see if there are any boundaries set, and if we need to reverse our direction.
After that we’ll create a velocity vector. Velocity is in pixels per second. In this case, I’m assuming the user set the velocity in pixels per frame in Tiled instead, so we’ll convert.
Warning
Changing center_x and center_y will not move the sprite. If you want to change
a sprite’s position, use the physics engine’s set_position method.
Also, setting an item’s position “teleports” it there. The physics engine will happily move the object right into another object. Setting the item’s velocity instead will cause the physics engine to move the item, pushing any dynamic items out of the way.
        self.physics_engine.step()

        # For each moving sprite, see if we've reached a boundary and need to
        # reverse course.
        for moving_sprite in self.moving_sprites_list:
            if moving_sprite.boundary_right and \
                    moving_sprite.change_x > 0 and \
                    moving_sprite.right > moving_sprite.boundary_right:
                moving_sprite.change_x *= -1
            elif moving_sprite.boundary_left and \
                    moving_sprite.change_x < 0 and \
                    moving_sprite.left > moving_sprite.boundary_left:
                moving_sprite.change_x *= -1
            if moving_sprite.boundary_top and \
                    moving_sprite.change_y > 0 and \
                    moving_sprite.top > moving_sprite.boundary_top:
                moving_sprite.change_y *= -1
            elif moving_sprite.boundary_bottom and \
                    moving_sprite.change_y < 0 and \
                    moving_sprite.bottom < moving_sprite.boundary_bottom:
                moving_sprite.change_y *= -1

            # Figure out and set our moving platform velocity.
            # Pymunk uses velocity is in pixels per second. If we instead have
            # pixels per frame, we need to convert.
Add Ladders
The first step to adding ladders to our platformer is modify the __init__
to track some more items:
Have a reference to a list of ladder sprites
Add textures for a climbing animation
Keep track of our movement in the y direction
Add a boolean to track if we are on/off a ladder
 1    def __init__(
 2        self, ladder_list: arcade.SpriteList, hit_box_algorithm: arcade.hitbox.HitBoxAlgorithm
 3    ):
 4        """Init"""
 5        # Let parent initialize
 6        super().__init__(scale=SPRITE_SCALING_PLAYER)
 7
 8        # Images from Kenney.nl's Character pack
 9        # main_path = ":resources:images/animated_characters/female_adventurer/femaleAdventurer"
10        main_path = ":resources:images/animated_characters/female_person/femalePerson"
11        # main_path = ":resources:images/animated_characters/male_person/malePerson"
12        # main_path = ":resources:images/animated_characters/male_adventurer/maleAdventurer"
13        # main_path = ":resources:images/animated_characters/zombie/zombie"
14        # main_path = ":resources:images/animated_characters/robot/robot"
15
16        idle_texture = arcade.load_texture(
17            f"{main_path}_idle.png", hit_box_algorithm=hit_box_algorithm
18        )
19        jump_texture = arcade.load_texture(f"{main_path}_jump.png")
20        fall_texture = arcade.load_texture(f"{main_path}_fall.png")
21
22        # Load textures for idle standing
23        self.idle_texture_pair = idle_texture, idle_texture.flip_left_right()
24        self.jump_texture_pair = jump_texture, jump_texture.flip_left_right()
25        self.fall_texture_pair = fall_texture, fall_texture.flip_left_right()
26
27        # Load textures for walking
28        self.walk_textures = []
29        for i in range(8):
30            texture = arcade.load_texture(f"{main_path}_walk{i}.png")
31            self.walk_textures.append((texture, texture.flip_left_right()))
32
33        # Load textures for climbing
34        self.climbing_textures = []
35        texture = arcade.load_texture(f"{main_path}_climb0.png")
36        self.climbing_textures.append(texture)
37        texture = arcade.load_texture(f"{main_path}_climb1.png")
38        self.climbing_textures.append(texture)
39
40        # Set the initial texture
41        self.texture = self.idle_texture_pair[0]
42
43        # Default to face-right
44        self.character_face_direction = RIGHT_FACING
45
46        # Index of our current texture
47        self.cur_texture = 0
48
49        # How far have we traveled horizontally since changing the texture
50        self.x_odometer = 0
51        self.y_odometer = 0
52
53        self.ladder_list = ladder_list
54        self.is_on_ladder = False
Next, in our pymunk_moved method we need to change physics when we are
on a ladder, and to update our player texture.
When we are on a ladder, we’ll turn off gravity, turn up damping, and turn down our max vertical velocity. If we are off the ladder, reset those attributes.
When we are on a ladder, but not on the ground, we’ll alternate between a couple climbing textures.
 1    def pymunk_moved(self, physics_engine, dx, dy, d_angle):
 2        """Handle being moved by the pymunk engine"""
 3        # Figure out if we need to face left or right
 4        if dx < -DEAD_ZONE and self.character_face_direction == RIGHT_FACING:
 5            self.character_face_direction = LEFT_FACING
 6        elif dx > DEAD_ZONE and self.character_face_direction == LEFT_FACING:
 7            self.character_face_direction = RIGHT_FACING
 8
 9        # Are we on the ground?
10        is_on_ground = physics_engine.is_on_ground(self)
11
12        # Are we on a ladder?
13        if len(arcade.check_for_collision_with_list(self, self.ladder_list)) > 0:
14            if not self.is_on_ladder:
15                self.is_on_ladder = True
16                self.pymunk.gravity = (0, 0)
17                self.pymunk.damping = 0.0001
18                self.pymunk.max_vertical_velocity = PLAYER_MAX_HORIZONTAL_SPEED
19        else:
20            if self.is_on_ladder:
21                self.pymunk.damping = 1.0
22                self.pymunk.max_vertical_velocity = PLAYER_MAX_VERTICAL_SPEED
23                self.is_on_ladder = False
24                self.pymunk.gravity = None
25
26        # Add to the odometer how far we've moved
27        self.x_odometer += dx
28        self.y_odometer += dy
29
30        if self.is_on_ladder and not is_on_ground:
31            # Have we moved far enough to change the texture?
32            if abs(self.y_odometer) > DISTANCE_TO_CHANGE_TEXTURE:
33                # Reset the odometer
34                self.y_odometer = 0
35
36                # Advance the walking animation
37                self.cur_texture += 1
38
39            if self.cur_texture > 1:
40                self.cur_texture = 0
41            self.texture = self.climbing_textures[self.cur_texture]
42            return
43
44        # Jumping animation
45        if not is_on_ground:
46            if dy > DEAD_ZONE:
47                self.texture = self.jump_texture_pair[self.character_face_direction]
48                return
49            elif dy < -DEAD_ZONE:
50                self.texture = self.fall_texture_pair[self.character_face_direction]
51                return
52
53        # Idle animation
54        if abs(dx) <= DEAD_ZONE:
55            self.texture = self.idle_texture_pair[self.character_face_direction]
56            return
57
58        # Have we moved far enough to change the texture?
59        if abs(self.x_odometer) > DISTANCE_TO_CHANGE_TEXTURE:
60            # Reset the odometer
61            self.x_odometer = 0
62
63            # Advance the walking animation
64            self.cur_texture += 1
65            if self.cur_texture > 7:
66                self.cur_texture = 0
67            self.texture = self.walk_textures[self.cur_texture][self.character_face_direction]
Then we just need to add a few variables to the __init__ to track ladders:
 1    def __init__(self, width, height, title):
 2        """Create the variables"""
 3
 4        # Init the parent class
 5        super().__init__(width, height, title)
 6
 7        # Player sprite
 8        self.player_sprite: PlayerSprite | None = None
 9
10        # Sprite lists we need
11        self.player_list: arcade.SpriteList | None = None
12        self.wall_list: arcade.SpriteList | None = None
13        self.bullet_list: arcade.SpriteList | None = None
14        self.item_list: arcade.SpriteList | None = None
15        self.moving_sprites_list: arcade.SpriteList | None = None
16        self.ladder_list: arcade.SpriteList | None = None
17
18        # Track the current state of what key is pressed
19        self.left_pressed: bool = False
20        self.right_pressed: bool = False
21        self.up_pressed: bool = False
22        self.down_pressed: bool = False
23
24        # Physics engine
25        self.physics_engine: Optional[arcade.PymunkPhysicsEngine] = None
26
27        # Set background color
28        self.background_color = arcade.color.AMAZON
Then load the ladder layer in setup:
        map_name = ":resources:/tiled_maps/pymunk_test_map.json"

        # Load in TileMap
        tile_map = arcade.load_tilemap(map_name, SPRITE_SCALING_TILES)
Also, pass the ladder list to the player class:
        self.wall_list = tile_map.sprite_lists["Platforms"]
        self.item_list = tile_map.sprite_lists["Dynamic Items"]
Then change the jump button so that we don’t jump if we are on a ladder. Also, we want to track if the up key, or down key are pressed.
 1    def on_key_press(self, key, modifiers):
 2        """Called whenever a key is pressed."""
 3
 4        if key in (arcade.key.LEFT, arcade.key.A):
 5            self.left_pressed = True
 6        elif key in (arcade.key.RIGHT, arcade.key.D):
 7            self.right_pressed = True
 8        elif key in (arcade.key.UP, arcade.key.W):
 9            self.up_pressed = True
10            # find out if player is standing on ground, and not on a ladder
11            if (
12                self.physics_engine.is_on_ground(self.player_sprite)
13                and not self.player_sprite.is_on_ladder
14            ):
15                # She is! Go ahead and jump
16                impulse = (0, PLAYER_JUMP_IMPULSE)
17                self.physics_engine.apply_impulse(self.player_sprite, impulse)
18        elif key in (arcade.key.DOWN, arcade.key.S):
19            self.down_pressed = True
Add to the key up handler tracking for which key is pressed.
 1    def on_key_release(self, key, modifiers):
 2        """Called when the user releases a key."""
 3
 4        if key in (arcade.key.LEFT, arcade.key.A):
 5            self.left_pressed = False
 6        elif key in (arcade.key.RIGHT, arcade.key.D):
 7            self.right_pressed = False
 8        elif key in (arcade.key.UP, arcade.key.W):
 9            self.up_pressed = False
10        elif key in (arcade.key.DOWN, arcade.key.S):
11            self.down_pressed = False
Next, change our update with new updates for the ladder.
 1        # Add the sprite. This needs to be done AFTER setting the fields above.
 2        self.physics_engine.add_sprite(
 3            bullet,
 4            mass=BULLET_MASS,
 5            damping=1.0,
 6            friction=0.6,
 7            collision_type="bullet",
 8            gravity=bullet_gravity,
 9            elasticity=0.9,
10        )
11
12        # Add force to bullet
13        force = (BULLET_MOVE_FORCE, 0)
14        self.physics_engine.apply_force(bullet, force)
15
16    def on_update(self, delta_time):
17        """Movement and game logic"""
18
19        is_on_ground = self.physics_engine.is_on_ground(self.player_sprite)
20        # Update player forces based on keys pressed
21        if self.left_pressed and not self.right_pressed:
22            # Create a force to the left. Apply it.
23            if is_on_ground or self.player_sprite.is_on_ladder:
24                force = (-PLAYER_MOVE_FORCE_ON_GROUND, 0)
25            else:
26                force = (-PLAYER_MOVE_FORCE_IN_AIR, 0)
27            self.physics_engine.apply_force(self.player_sprite, force)
28            # Set friction to zero for the player while moving
29            self.physics_engine.set_friction(self.player_sprite, 0)
30        elif self.right_pressed and not self.left_pressed:
31            # Create a force to the right. Apply it.
32            if is_on_ground or self.player_sprite.is_on_ladder:
33                force = (PLAYER_MOVE_FORCE_ON_GROUND, 0)
34            else:
35                force = (PLAYER_MOVE_FORCE_IN_AIR, 0)
36            self.physics_engine.apply_force(self.player_sprite, force)
37            # Set friction to zero for the player while moving
And, of course, don’t forget to draw the ladders:
1    def on_draw(self):
2        """Draw everything"""
3        self.clear()
4        self.wall_list.draw()
5        self.ladder_list.draw()
6        self.moving_sprites_list.draw()
7        self.bullet_list.draw()
8        self.item_list.draw()
9        self.player_list.draw()